

We had wrapped up the Airfloat for winter in September of 2016. She sat patiently waiting for her trip to the spa.
That winter was hard on us. sickness, death (my dad), flooding and numerous other things seemed to plague our family. It took us until early spring to start looking for a place to start her restoration . I put an add on a local bulletin board. I was so excited when someone responded! She had a space we could rent. It was nothing more than a piece of land, but it would do! We purchased an event tent (the largest one we could find), and waited for the ground to dry out.
The rain receded and the day finally arrived when we could install the tent. They say building a house is hard on a relationship….I think putting up a tent is worse.

They day we moved her in was momentous. She was finally in a place we could start working on her.

We could not wait to dig in. We did an inspection of things we knew we needed to replace. She was complete (sans 2 lights), but things like hinges, and lights were going to need to be replaced due to rust or heat damage. We needed to know up front what to look for, as parts can be scarce. Lists were made. Lots and lots of lists.
Then, we started the painstaking process of meticulously tearing her apart. This process can be disheartening. Just keep reminding yourself that you have to go down to build up.

We labeled everything that came off of the trailer. On a smaller trailer, this is not as important. On a large trailer, it is a must. We wanted to save every part and piece possible. If we couldn’t use it, we needed it for reference at the very least. I found Tyvek labels on Amazon. The wires work well for tying on to parts.
TIP: Remember to measure everything before you take apart your trailer. Do not just go in with a sledge hammer and start demo! Measure twice. Keep a notebook. Even things you do not think you will need to measure. 1/4 inch can make a huge difference in the end product.

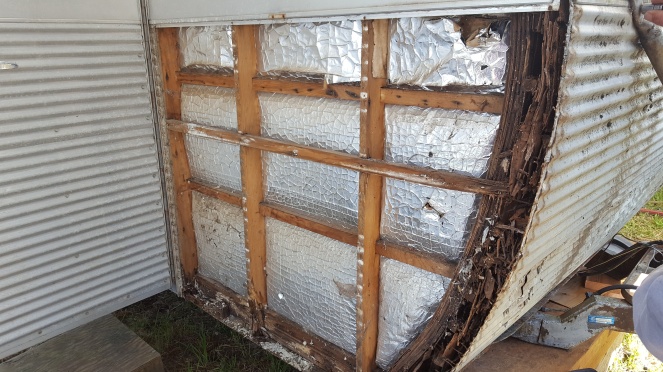
Once we started pulling the skin off, we were baffled she had made it home in one piece. We came to the conclusion that she wanted to get here. Her front and rear ends fell apart as the skin was peeled back. On one hand, we were not surprised, and on the other we had hoped we had for a better pattern to go by which would make the restoration go smoother….but this was not meant to be. In some areas, we were actually taking it apart with a vacuum (yes, really!) All the trim was put on with screw nails. These things were the bane of our existence. Vampliers to the rescue. These things are, seriously, a life saver!

In one of the cabinets, we found what we believe to be the original shipping label from the factory. She had made it full Circle, and was back in Sonoma County.


